Edit: Up to date description of the technology stack.
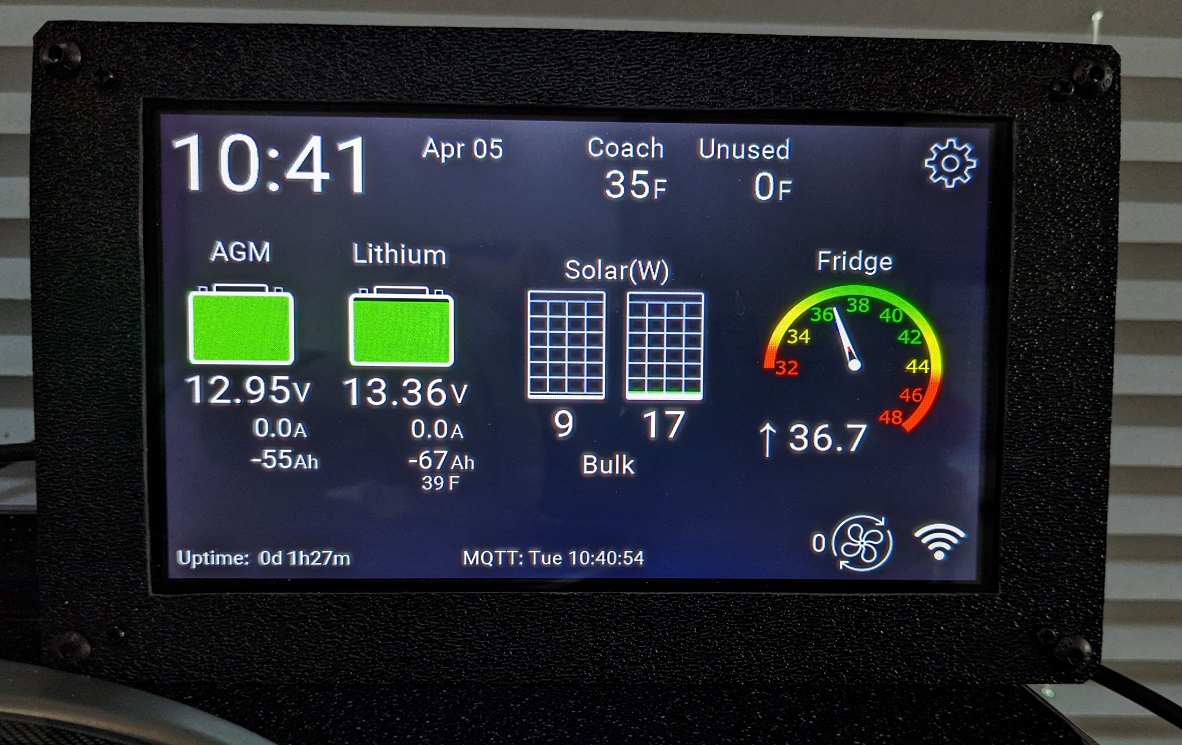
I’ve made progress on the information screen that I want to incorporate into the camper. As hinted at in the message bus post, I’m using a 7″ Nextion display and an ESP32 to create a touch screen interface into the temperature and electrical data that I’ve been gathering on the camper and uploading to the Blynk cloud.
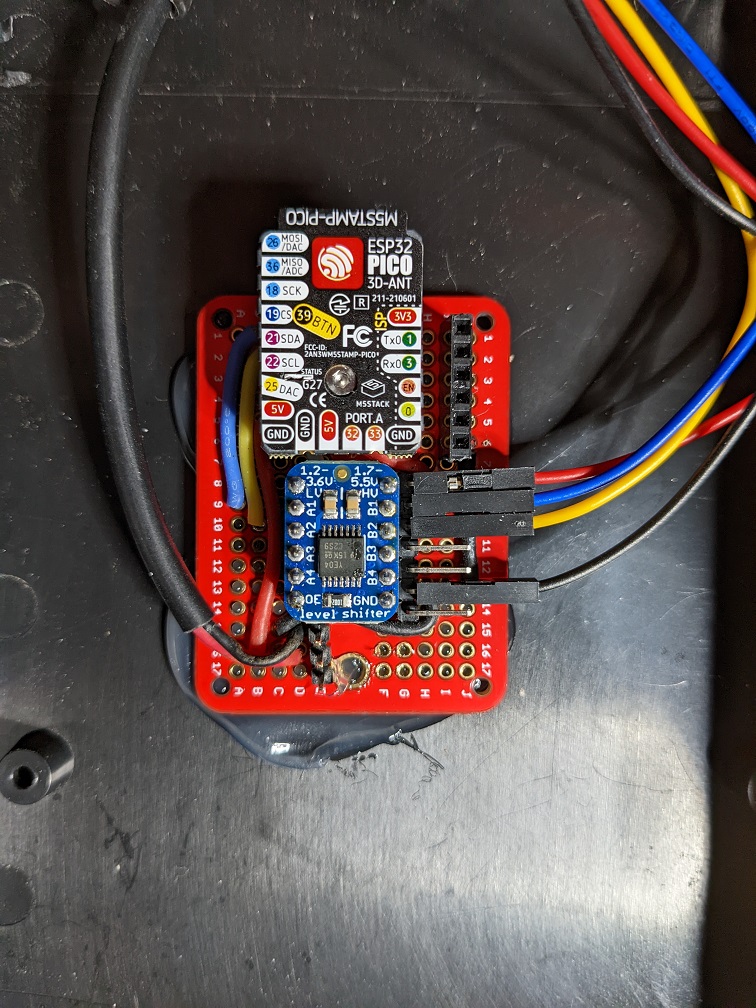
The ESP32 microcontroller that I’m using is a tiny M5Stamp-Pico. It’s about the size of a postage stamp, has the processing power of a 25-year-old Pentium, has WiFi & Bluetooth, and draws only a few hundred milli-amps. I’m using C++ and Arduino libraries to program the ESP32; Visual Studio Code and PlatformIO to edit the code and compile the firmware. It’s a slick build environment.
The code for this (and my other projects) is available in my Github repository
At first I thought I’d permanently mount the display by flush-mounting it into a panel somewhere in the camper and powering it via the camper’s 12V DC. I have no idea if it’ll be useful though, so instead I decided to mount it in a plastic box and power it via a USB cable. We can move it around the camper and (maybe) decide a permanent location if it’s a useful addition to the camper.
The ESP32 microcontroller is soldered into a small PC board and stuck to the back of the plastic box with a blob of silicone. I’m using a level shifter to drive the 5-volt Nextion serial port from the 3.3-volt ESP32 I/O pins.
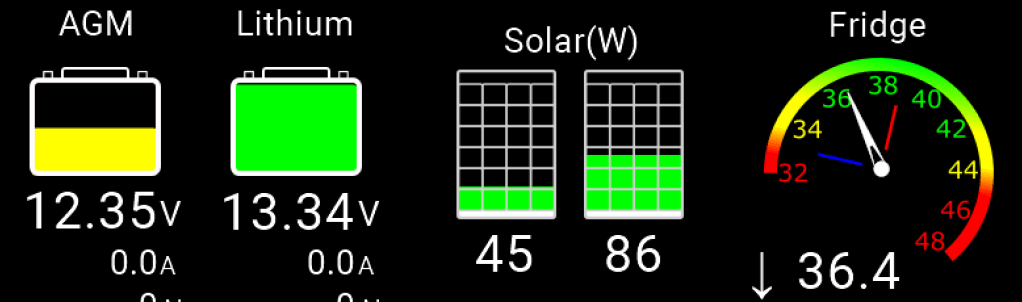
As of now, I have a couple of icons showing battery status (that change color to green/yellow/red & have charge/discharge indicators), solar panel output in watts, fridge temperature with min/max indicators, an animated icon showing fan speed, a WiFi status icon, and date/time & uptime fields. The ‘Gear’ icon switches to a screen that allows you to set the clock time & date, set the screen brightness, and sleep timeout.
Thoughts on the Nextion display.
Interfacing to the display is fairly simple compared to alternatives. Once the screens are designed in the Nextion GUI designer and uploaded to the display, widget updates are done by sending ASCII text to an old-fashioned serial port, just like it’s 1995. For example, if I have a widget called ‘V1’ configured to show voltage in hundredths of a volt, I’d send the text ‘V1.val=1234‘ via the serial port. The ‘V1’ widget would then display the numbers ‘12.34‘. Text boxes, number fields, buttons, gauges, are all placed on screen via the screen designer. Dynamic updates to the widgets are done via the serial port.
In my implementation, I can connect to the ESP32 either via MQTT (a TCP/IP network connection) or via Bluetooth Low Energy (BLE), send the ASCII text commands to the ESP32, which forwards them to the Nextion display via a serial port. Any commands or data returned from the display are forwarded back to both BLE and MQTT.
The Nextion also has a fair bit of intelligence built into the display. Its built-in instruction set can read and write variables, perform basic branching and looping, respond to touch events, set triggers and timers, and more. I set it up so that some functionality (the clock, calendar, screen brightness, sleep/wake) are done by the logic in the display rather than the ESP32 microcontroller.
Quite a bit of configuration can be done using the Nextion GUI designer application. For example, if I wanted to change the size, shape or location of any of the on-screen widgets, I can do that without recompiling the ESP32 firmware. Because the ESP32 firmware mostly just forwards commands from MQTT or BLE to the Nextion, if I make changes to the display, such as adding or removing widgets (or even entire screens), I’ll have to modify whatever python scripts are feeding the MQTT message bus or BLE interface, but not the C++ program compiled into ESP32 firmware. Much simpler that way.
The display has the ability to animate GIF’s. I leveraged this to show the rotation speed of the refrigerator fan, by creating a GIF made of 16 fan icons, each rotated 16/360’th degree from the one before, with a few hundred milliseconds delay between each image. The Nextion will animate the gif proportional to value (0-100) sent via the serial port. Sending ‘Fan.val=100‘ will animate the gif at maximum speed, ‘Fan.val=50‘ will spin the icon at half-speed, and ‘Fan.val=0‘ will stop the animation.
Still a long way from a ‘Smart’ camper though. I’d love to be able to integrate the Truma furnace/water heater, lights, and vent fan into this system – but so far I’ve not found a way to do any of that.

Leave a comment