
If you are familiar with lithium batteries (LiFePo4) you know that they are not happy when they are cold. Charging a LifePo4 battery when the battery is below freezing or storing it below -4°F will damage the battery. Some batteries have built-in circuitry that cuts off charging at damaging temperatures and some have built-in heaters. Some RV manufactures mitigate this by heating batteries or battery compartments. Other manufacturers do a bit of magic hand-waving and send the new owner down the road.
A year ago, I purchased a 12 volt external battery heater and temperature switch from Battle Born that wraps three sides of the lithium battery with a 15 watt self-adhering neoprene heating blanket. In theory the heater and thermostat will keep the battery above freezing. In practice, it’s not that simple.
Last winter I left the heater on with the factory-supplied temperature switch and minimal insulation. Because I wasn’t charging the battery, I didn’t care if it got below freezing so I didn’t set up any temperature measuring/logging. When temps dipped below 0°F, either I heated the whole camper or took the battery indoors. This winter I decided to get accurate temperature measurements and determine how effective the battery heater was under various conditions.
Plan A – Thornwave and SensorPush:
My Thornwave battery monitors have a built-in temperature sensor and the ability to use an external DS18B20 temperature sensor. The Thornwave can theoretically supply the 3.3 volts that the DS18B20 needs. I couldn’t get that to work but found out that if I powered the probe with an external 3.3- or 5-volt source I could get good temperature readings. I wired that up temporarily and started logging data. I also have SensorPush temperature sensors that I’ve been using to track refrigerator temperature. I stuffed one of those under my mediocre, poorly fitted battery insulation. The SensorPush logs data internally, and with it’s Bluetooth app can display logged data on a smartphone.
From a few days of playing around I learned that:
- The Battle Born supplied temperature switch wasn’t reliable. It’s supposed to close at 35F. It was sometimes staying open as low as 26F. Battle Born suggested repositioning the switch. I’m going to try to get a replacement from them. In the mean time I’m cycling the heater with an inexpensive digital temperature switch in parallel with the Battle Born switch.
- My insulation wasn’t adequate. The temperature variation across the battery was pretty steep. I had 1/4″ of EPS around the battery, but it was poorly fitted. I replaced the EPS with thicker XPS, and used a Thermo-Tec blanket that I had laying around in places where the XPS wouldn’t work. I’m extremely limited on space, so the best I can do is 1/2″ of XPS in some places and 1/4″ of Thermo-Tec in others. I suspect that Aerocel or Thinsulate would be better than the Thermo-Tec, and I’m sure that getting the XPS panels to fit better will help.
- Powering the DS18B20 means supplying 5 volt power in a 12 volt camper.
I’m not happy with having to externally power the Thornwave-connected temperature probe, and I can only access the SensorPush logs when I’m in Bluetooth range. So I searched around for some other way of measuring and logging temperature. Ideally I’d come up with a way that could be integrated into the power monitoring dashboard I built last summer.
Plan B – Raspberry Pi and SensorPush
Raspberry Pi’s have a plethora of I/O pins built in, and some of the pins can be configured for the one-wire data protocol used by the DS18B20 temperature sensors. I already have a Pi in the camper collecting the data for the power monitoring dashboard. With bit of configuring and kernel poking the DS18B20 was readable from the Pi. I decided to hard-wire and permanently mount the Pi in one of the electrical compartments rather than leaving it bungeed to the TV and powered from USB port.
I purchased a 12 to 5 volt DC/DC step down converter to supply 5 volt power to the Pi and used the Pi to power the probe. Adding a terminal block (‘HAT’) to the Pi made connecting the probe easier. I used Wago 221 lever nuts to connect the low voltage wires. These are new to me. I’ll see how they work in a camper.
I also did a bit of playing around with reading the SensorPush directly from the Pi via Bluetooth, as I am with the Thornwave battery monitors. I didn’t get very far. I did however, obtain a Bluetooth temperature sensor that is readable from a Pi. More on that in another post – the sensor API isn’t officially released yet & the manufacturer asked me not write about it on the Internet.
As of now, I have:
- A digital temperature switch controlling the battery heater. The probe for the heater is affixed to the coldest corner of the battery. The temperature switch is programmed to cycle between 38 and 41°F.
- A DS18B20 temperature probe, also affixed to the coldest corner of the battery. The probe is connected to the Pi, which records and uploads the temperature to every minute.
- A Bluetooth temperature sensor on top of the battery, under the insulation. The Pi reads the temperature via Bluetooth and uploads it every minute.
- A ‘Temperature’ page of the power monitoring dashboard, showing up-to-the minute temperatures from the DS18B20, the Bluetooth sensor, and the Thornwave monitors.
I mounted the Raspberry Pi, DC/DC converter and digital temperature sensor on a sheet of HDPE and stuffed it into one of the electrical compartments.

Dashboards
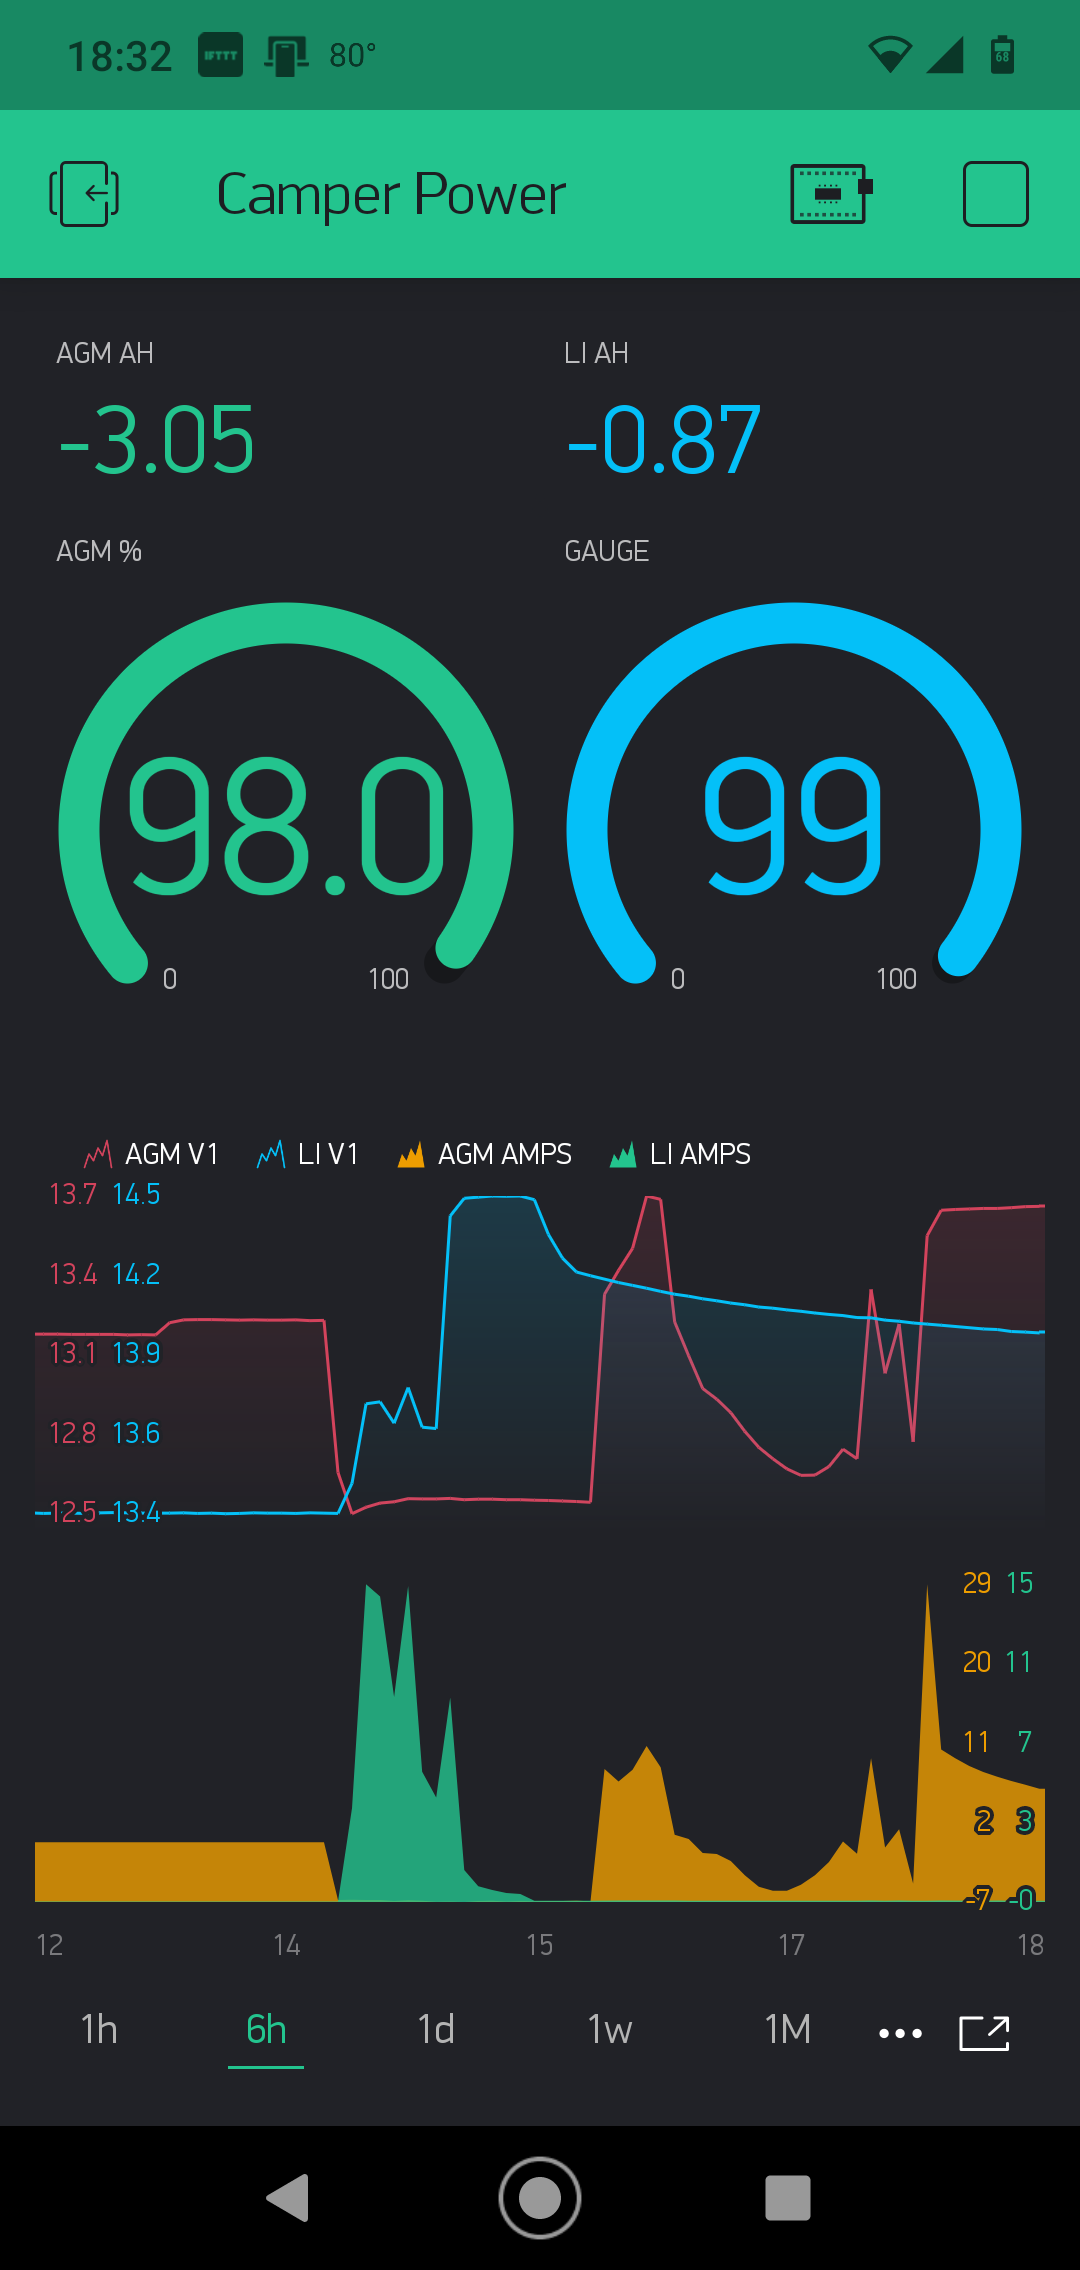

The ‘power’ dashboard shows battery voltage, battery current and state of charge for each battery. You can see charge/discharge cycles in the graphs.
The ‘temperature’ dashboard currently shows temperature readings from the two Thornwave battery monitors (effectively the same as the cabin temperature), and the Bluetooth and DS18B29 temperature sensors collocated with the lithium battery. You can see the cabin temperatures fall and rise over a day/night/day cycle, while the battery temperatures rise and fall as the heater cycles.
The temperature dashboard also has a an alerting capability, so I get a push notification if the battery gets too cold.
The dashboards are created using Blynk IoT platform and Android app. The measurements are gathered via Bluetooth using Python apps that I wrote, or via a shell script (DS18B20/Pi). The data is uploaded to Blynk using their API.
Future:
When it gets warm enough that I care more about the fridge temp than the battery temp, I’ll move the I’ll probably move the Bluetooth temp sensor into the fridge and set up a dashboard that tracks fridge and cabin temp.
I’ll probably take another stab at better insulation. I think I’ll try Aerocel or Thinsulate where I need flexible insulation and re-cut the XPS where I have rigid insulation.

Leave a comment